As a Mac user, I often find myself needing to share my screen—whether to create a tutorial, showcase a project, or demonstrate software. Luckily, screen recording on a Mac is a straightforward process that can be done for free using built-in tools like QuickTime and the Screenshot toolbar, as well as third-party applications. In this guide, I’ll walk you through the methods available, sharing personal tips and experiences to help you make the most of your screen recording endeavors.
Key Takeaways
- Built-in Options: Use the Screenshot toolbar (available in Mojave and later) or QuickTime Player to record your screen without needing additional software.
- Third-Party Tools: Explore advanced features through applications like Snagit and Screencast-O-Matic for more complex recording needs.
- Editing and Sharing: After recording, easily trim, save, or share your videos directly from the recording interface.
How to Screen Record on Mac: Step-by-Step Guide
1. Screen Recording on Mojave and Catalina Using the Screenshot Toolbar
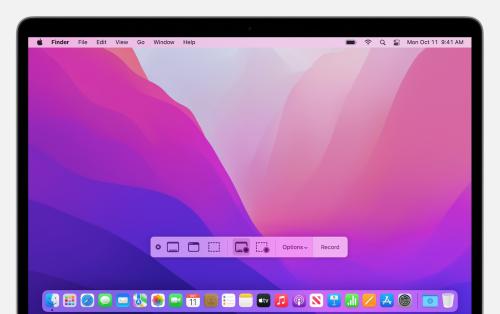
For users with macOS Mojave or later, the Screenshot toolbar provides a user-friendly way to capture your screen.
Step 1: Access the Screenshot Toolbar
Press Shift + Command + 5 simultaneously to open the Screenshot toolbar. A set of options will appear at the bottom of your screen.
Step 2: Configure Settings
Before starting your recording, click on the Options button to set your preferences:
- Save To: Choose a destination for your recordings (Desktop, Documents, etc.).
- Timer: Set a delay of 5 or 10 seconds, or start recording immediately.
- Microphone: Select your audio source—use the built-in microphone or an external option.
- Show Mouse Clicks: Opt to highlight mouse clicks during your recording.
Step 3: Record Your Screen
To record your entire screen:
- Click the screen icon with a solid outline.
For recording a specific portion:
- Click the dotted outlined screen icon, select the area you want to record, and then click Record.
Step 4: Stop the Recording
You can stop recording by clicking the Stop icon in the menu bar or by pressing Command + Control + Esc.
Step 5: Edit and Save
Once you stop the recording, a thumbnail appears in the lower right corner. You can trim the video by clicking the Trim button and adjust the sliders to select the desired segment. Hit Done to save your changes.
2. Screen Recording with QuickTime Player
For those using older macOS versions, QuickTime Player is a reliable alternative.
Step 1: Open QuickTime Player
Launch QuickTime Player from your Applications folder or search for it using Spotlight.
Step 2: Start a New Screen Recording
Click on File > New Screen Recording. A recording window will pop up.
Step 3: Adjust Recording Settings
Click the arrow next to the Record icon to select your microphone and adjust volume settings.
Step 4: Begin Recording
Click the Record button:
- Click anywhere on the screen for a full-screen recording.
- Drag to select a specific area.
Step 5: Stop Recording
Press the Stop button in the menu bar or use Command + Control + Esc to finish.
Step 6: Edit and Save
The recorded video will open automatically. You can trim, save, or share it directly.
3. Using Third-Party Software for Advanced Features
Sometimes, built-in tools may not suffice, especially for intricate projects. Third-party applications provide additional features that enhance your recording experience.
Best Screen Recording Software for Mac
1. Snagit
- Known for its user-friendly interface, Snagit allows easy screen recording and video editing.
- Integrates seamlessly with popular applications like Slack and Google Drive.
2. Screencast-O-Matic
- Offers a free version for basic recordings and paid plans for advanced features like automated captioning.
- Ideal for users who want to add annotations and music to their recordings.
Frequently Asked Questions (FAQs)
Q1: Can I record audio while screen recording on my Mac?
A: Yes, both the Screenshot toolbar and QuickTime Player allow you to select a microphone for audio recording.
Q2: How do I edit my recorded video?
A: You can trim your video directly from the thumbnail after recording or use editing tools in third-party applications.
Q3: Are there limits on recording time with the free versions of screen recording software?
A: Yes, some tools, like Screencast-O-Matic’s free version, limit recording time to 15 minutes.
Conclusion
Screen recording on a Mac is an invaluable skill that can enhance your productivity and help you share knowledge effectively. Whether you opt for the built-in tools or advanced third-party applications, the process is accessible and straightforward. By following the steps outlined in this guide, you can create high-quality recordings that meet your needs, whether for professional tutorials or personal projects.
For more information, you can explore the following resources:


